Cool Easy Drawings of Ponys
Today we'll draw a cute pony. It may look very simple, only it will be based on a realistic horse—only in less advanced class. You'll larn how to build a "base" for a drawing and how to measure with lines. Yous just need:
- a pencil (the softer, the amend)
- two sheets of paper (information technology can be a cheap copy paper)
- a ball-point pen or a marker (something that makes dark lines)
You don't need an eraser!


1. Describe the Body
Step 1
Have 1 sheet of paper. Imagine an oval and sketch it very lightly with your pencil. Don't draw information technology all with one line. Try to employ curt lines with gaps.


Step 2
Divide the oval into halves. If you don't know how, hither's a way:
Detect the center of the oval and mark it with a dot. So draw i dot on the right and i on the left. Join them with a line to split up the oval into halves.


Step 3
Describe a circumvolve adjacent to the oval. Make information technology a chip smaller.


Pace four
Now join upwards both shapes with curved lines. The body is finished!


2. Depict the Legs
Stride one
Get-go depict two lines to observe the right place for the legs. The front one (here: left) should be in the forepart half of the chest-oval. The back one should be placed in the back half of the bum-circle.


Step two
Marker the places where both lines touch the body (1) and the basis (2). Tin can y'all see a line between them? Mark the centre of information technology.


Pace 3
Now mark the eye of each half.


Step 4
These marks will aid us put all the parts of each leg in the right places. We can draw lines to plan how wide each of them will exist:
- The base of operations of the hoof: the longer this line, the more like a typhoon horse the pony will look.
- The summit of the hoof: make it a fleck shorter than the hoof.
- The wrist/heel: make it even shorter.
- The elbow: brand information technology longer than the hoof.


Step 5
Now outline the lines with ovals or circles:
- Hoof and elbow with an oval
- Wrist/heel with a circle


Footstep 6
We now have enough lines to depict the hooves:


Step 7
To describe the lower legs, join up the hoof with the wrist/heel. If yous want to make them more than realistic, make the lines curve inward.


Footstep 8
At present join up the wrist with the elbow, and the heel with the bum.


3. Describe the Head
Stride 1
Outset by drawing the neck—a single curved line.


Pace 2
Adhere a line to the cervix. This will be the base of operations of the caput.


Step three
Draw 2 circles on the line. Make one very large (the head) and 1 smaller (the snout).


Pace iv
Depict the center, the nose, and the smile.


Step 5
Join the two "head-circles" with gentle lines to complete the head.


Footstep 6
Now join the caput with the body by drawing ii lines similar to the cervix-line.


4. Add Details
Stride 1
To draw an ear, depict a line from the middle of the head.


Step ii
And so bring together it with the head, creating a "curved triangle".


Step three
Describe the mane in any style yous desire.


Footstep 4
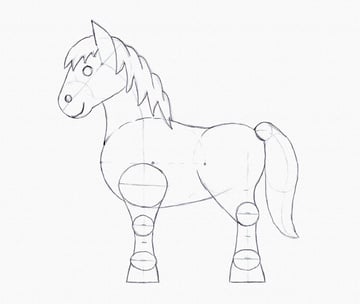
Put a circle at the terminate of the bum to create the base for a tail.


Stride 5
Draw a curved line to show where the tail will become.


Pace 6
Draw an oval "attached" to the line.


Step seven
Yous can now outline the lines to create the tail.


5. Create the Final Cartoon
Step one
The base of operations is done! This is where the bodily cartoon starts. Accept a ball-point pen or annihilation that creates nighttime lines, and draw over the sketch. You lot can fix any mistakes now.

Step two
Have the second canvas of paper and put information technology right over the other. You should see the lines of the sketch underneath. If non, you can use a window to see it.


Step 3
Let's go back to drawing. This time we're working on the real picture, then be more careful. You tin can likewise use darker lines.
Depict an outline of the body using the shapes you can see beneath.


Step iv
Depict the hooves with two simple lines.


Pace 5
Draw the mane and tail. If you want, you can utilise a lot of lines to make it fluffy.


Step half dozen
Outline the eye, olfactory organ, and smile. Depict a spot of lite in the centre.


Step 7
Fill the eye and nose past drawing tiny circles inside.


Step eight
You can now remove the canvas underneath and finish the cartoon. For instance, you lot can create hair by drawing brusque lines all over the main outline. You tin also add some other pair of legs.


Congratulations!
Y'all've fabricated it! Just hey, it's not the end! Do yous call up that part where we were cartoon hooves, wrists, heels, and elbows? These will exist important for the adjacent function of this tutorial, in which we'll be learning how to describe a running pony!
Source: https://design.tutsplus.com/tutorials/drawing-for-kids-draw-a-pony--cms-24701
0 Response to "Cool Easy Drawings of Ponys"
Enviar um comentário